Mathematics | Secondary PDPP Candidate

Category: Uncategorised

Gallery Walk Poster

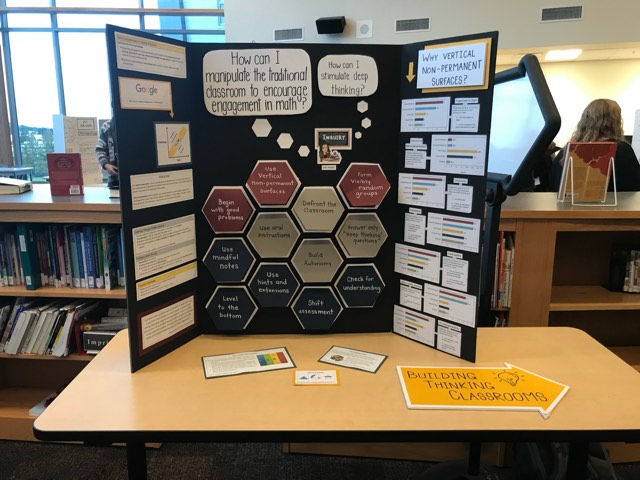
This semester, we have all been working hard on numerous inquiry projects. Among the projects not yet displayed on my blog, the Gallery Walk Inquiry poster presentation has become a project that I am quite proud of. I researched the “Building Thinking Classrooms” model as proposed by Dr. Peter Liljedahl, the same math researcher that presented the card trick videos.


As such, I wanted to find a way that I could, not only keep the information of the poster for my future career, but also bring my poster in as an “artifact of learning” for my exit interview. Given that I did not want to drag around my 36″ x 48″ poster, I decided to draw on my affinity for digital formatting. This also gave me an excuse to explore Apple Keynote as well as Microsoft Powerpoint, both of which I have (surprisingly) never used before!

My original poster highlights some of the findings for implementing the “Building Thinking Classrooms” model in the classroom with Peek-a-boo flaps that explain each step with sketch-notes. Therefore, I wanted to ensure that my digital rendition of this poster demonstrated the same ability. I used a non-linear approach to bounce through the slides much like a website interface. When you click on each section of the poster, you are redirected to a new slide that either zooms into a clearer view of the material, or surprises you with new information that was “hidden” under the hexagon flaps. This is done by “linking” images, shapes and text to other slides in the presentation. After each new linked slide I duplicated the original interface to immediately follow. This forces the user to return to the main poster and then choose a new link and repeat the process once again. In hindsight, this non-linear pathway is similar to the choose-your-own-adventure style that is highlighted in Twine!

The following is a screen cast demonstrating the non-linear path. I’ve gone through everything fairly quick, but feel free to pause and have a read. Alternatively, I have attached both the Keynote file (original output) and the powerpoint file (seamlessly converted) if you have any interest in this non-traditional classroom model!

Gallery Walk – Building Thinking Classrooms
Gallery Walk – Building Thinking Classrooms ppt

Math Card Tricks

I have been struggling with how to engage students in my future math classrooms. Some teachable subject areas, such as social studies and english, seem to have more freedom to explore topics with an inquiry based approach to actively engage students in the prescribed content. I haven’t, yet, discovered an inquiry approach to link the heavy content curriculum of secondary mathematics, but I have found an approach that might secure engagement in the classroom. Peter Liljedahl, of Simon Fraser University, introduced his use of card trick in the classroom in the paper “Card Tricks, Discovery Learning and Flow in Mathematics Teacher Education”.

He begins by acknowledging that mathematics instruction often follows the pattern of direct instruction, teacher led exemplification, followed by the assignment of homework. As such, our future teachers of math have been through this instruction and generally fall into two categories: secondary teachers from those few who thrive in this system (guilty) and elementary teacher from the many who do not. We talk about this internal debate in our mathematics methods classes: I’m sitting in these classes because I did truly thrive in the high school mathematics environment, but pedagogically I understand that mathematics and problem solving can be taught so much better. 

Dr. Liljedahl is primarily an instructor in mathematics teacher education, therefore, he is instructing the future of mathematics instruction. One way that he tries to break the structured mold of mathematics instruction is by allowing teacher candidates to rediscover mathematics on their own, and often through card tricks.

Questions to accompany this video could be:

  1. How did he do this?
  2. Could you reproduce this trick?
  3. What would change if we omitted the face cards?

Peter Liljedahl has posted nearly 20 videos of mathematics based card tricks to his website (http://www.peterliljedahl.com/teachers/card-tricks) for teachers to use in their classrooms. But there’s one catch – He doesn’t post the mathematics underlaying the trick. As with many of his resources, he believes that teachers can and should learn alongside their students. As we have recently learned in Psychology, when it comes to vicarious learning a coping model will likely be more beneficial than a mastery model. This way, the teacher is either required to produce and understand the solution prior to sharing with their students, or they can work it out with the class and, therefore, demonstrate an element of authenticity in problem solving.

The video formatting of these trick are beneficial, compared to a live play-by-play demonstration of the trick, in that you can pause the video in order to keep track of the inner working of the cards. Dr.Liljedahl does not demonstrate any card tricks on his website that require fancy skills or slight of hand performances, rather they are all mathematical and logic based puzzles that fit well into the classroom.

“Moonlight”

This project uses two different colours and is trying to portray water colour lettering with large water pockets. The colour almost completely fades out and you can hardly see the letters, yet you can still tell what the letters are. This achieves an array of super light transitions that looks like water is present right on top of the letters. We add some darker more saturated areas where the paint was likely dropped into the water.

The word that was used in the tutorial was “Colourful”, but I decided that this technique more resembled the word “moonlight”.

Enjoy!

Reading Break.

This was a fun challenge I decided to take on over reading break. Many digital artists I follow on Instagram use procreate to create dynamic, layered backgrounds and loop their calligraphy through multiple layers. I haven’t been able to find a tutorial for this, therefore I have been able to utilize the skills I have learned so far bring this technique to life.

I started by choosing a stock flat-lay from UnSplash.com. I then used the selection tool to duplicate the coffee mug and the top notebook. The key step is to place the lettering layer in between the flat-lay layer and the duplicated elements in order to achieve the effect of depth.

© 2024 Kelly Wallace

Theme by Anders NorenUp ↑